
Overview
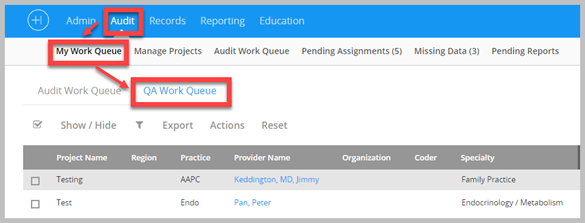
The QA workflow allows an additional individual(s) to review the initial Audit completed by the Auditor. After the Auditor completes the audit, they can push the audit into the QA Reviewers QA Work Queue. The QA Work Queue is located under Audit > My Work Queue > QA Work Queue.
User Settings
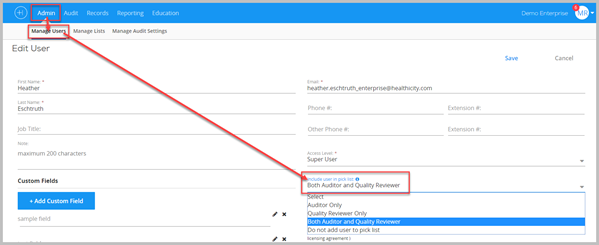
QA reviewing must be enabled in the user profile. Go to Admin > Manage Users > Click pencil to right of user to edit their profile.
- Picklist – in order to assign any user as a QA Reviewer, they must have either “QA Reviewer Only” or “Both Auditor and Quality Reviewer” selected in the INCLUDE USER IN PICK LIST field in the user profile.
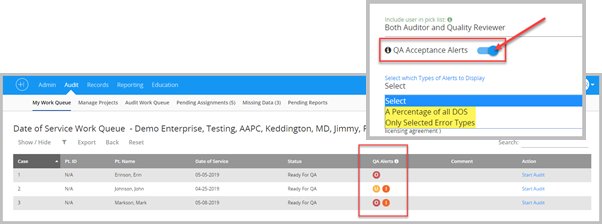
- QA Alert – Determine whether your QA reviewers want to see QA alerts when they open an audit.
- If yes, move the QA Acceptance Alerts toggle to blue (screenshot below)
- Select which Types of Alerts to Display
- A percentage of all DOS.
- Only Selected Error Types (screenshot example below) – under/over coded, incorrect, or Additional.
Assigning QA
There are 3 different ways to assign a QA Reviewer
1. During audit creation: whether assigning blank audits or importing claims, you can assign both the Auditor and QA Reviewer at this initial step in the Audit process.
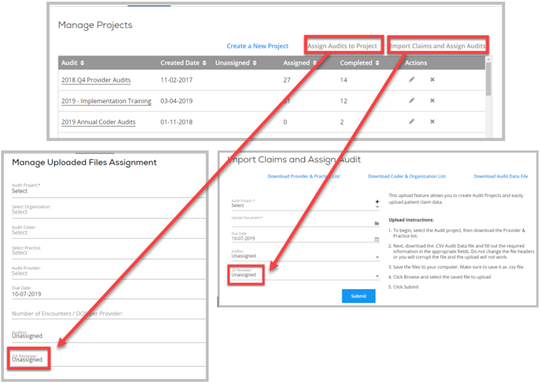
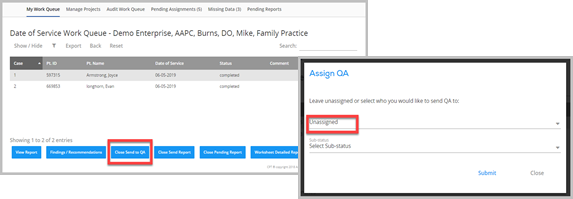
2. Auditor when clicking “Send QA” – if the QA Reviewer is not assigned upon audit creation, the auditor also has the ability to assign a QA Reviewer after they finish their auditing steps. After completing the audit > click Close Send to QA > if unassigned, an assignment window will pop up.
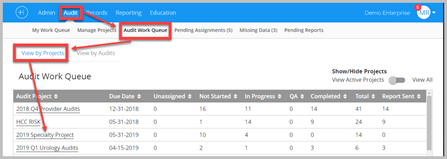
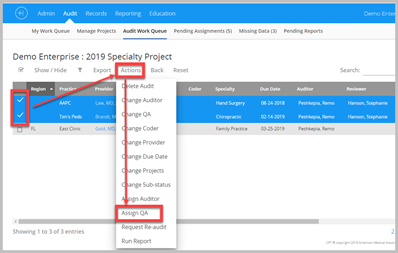
3. From Audit Work Queue – at any point in the audit workflow, a QA Reviewer can be assigned by users with either a Super User or Admin license. Go to Audit > Audit Work Queue > View by Projects > Click on Project name > check the box to left of audits to which you want to assign a QA Reviewer > click Actions > Assign QA > Submit.
The QA Workflow
1. Sending Audits to QA – to push an audit to the QA reviewers work queue, the auditor must be in the audit encounter view. Click “Close Send to QA”
a. The entire audit will be pushed into the QA Reviewers QA Work Queue.
b. The QA Reviewer has the choice to review 100% of the encounters, a randomized percent, or, those with errors identified by the auditor (see QA Alerts section)
2. Internal Notes – this is a feature within the Audit Box to enable auditors and QA reviewers to pass not es back and forth. Internal Notes do not display on any provider or project reports, they remain internal.
a. Internal notes are in the Audit Box > click the note icon in the upper right > type comment > click save. Comment will be time stamped with author’s name.
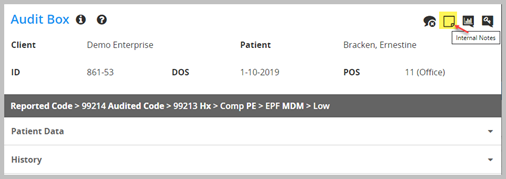
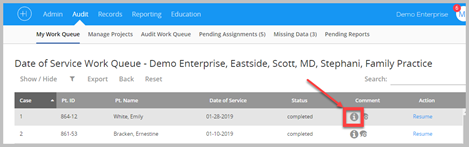
b. An info icon displays next to every encounter with an internal note, helping auditors and QA reviewers quickly identify notes.
3. QA making changes – any changes the QA reviewer makes to the selections, chart-level comments, or scoring will override those of the auditor.
a. The QA Reviewer can make direct changes to the encounter audit then click “Close Send Report” to finalize the audit and send it to the reporting section.
b. The QA Reviewer may prefer to NOT make direct changes, but, make note of any issues within internal notes, then, push the audit back to the auditor for review.
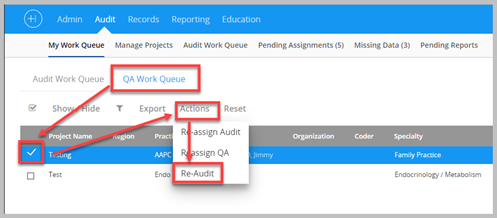
i. For the QA reviewer to send the audit back to the Auditor, they must be in the QA Work Queue view > place check in the box to the left of the audit > click Actions > select Re-Audit. This will push the entire audit back into the auditor’s My Work Queue.
c. If QA Reviewer sends the audit back, the auditor can identify encounters to review with the internal note icon, makes any necessary changes then either send the audit to the reporting section (Close Send Report) or send the audit back to the QA reviewer for a 2nd review (Close Send to QA).
4. Assigning a 2nd QA Reviewer – some organizations utilize the QA workflow to include a 2nd QA review, perhaps a manager wants to review all audits before they are finalized.
a. Auditor must push the audit back to the 1st QA reviewer by clicking Send to QA.
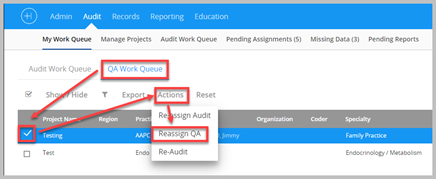
b. The 1st QA reviewer can now use the action button to Reassign QA to a 2nd user for a 2nd QA review.
Tracking QA Dates
Currently, Audit Manager does not track the dates that audits are sent to QA, sent back to the Auditor, or sent to a 2nd QA Reviewer. If tracking these dates is a requirement of your organization, you can ask your team to record the dates they move the audits as internal notes which can be reported on using a custom-built report.
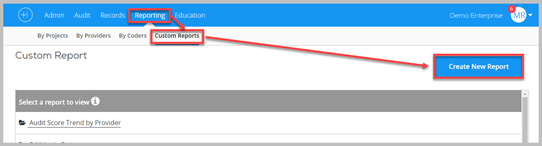
1. Internal Note Custom Report – to create an internal note report, go to Reporting > Custom Reports > Create New Report.
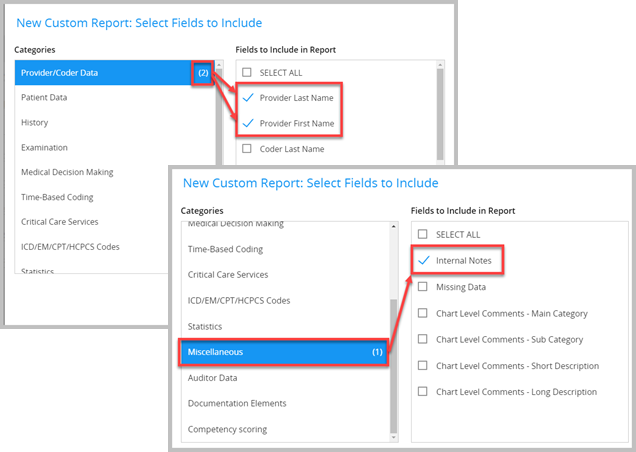
a. Select the fields under the different categories to include in the custom report.
i. Provider Last & First Name, project name, patient name/ID, auditor, completed date are some examples of fields to include
ii. The internal notes field is found under the Miscellaneous category.
Comments
0 comments
Please sign in to leave a comment.